Sunday, December 19, 2010

Korean Lunch


Yumyumyumyum. I am still eating but I had to post this so you (Bunny, my only reader (gawd ok and kara!! geez)) can make this as soon as possible. It turns out bulgogi is pretty easy to make at home. I followed the recipe at use real butter (who in turn got the recipe from the Kitchen Wench); since I couldn't find any beef chuck roast, I ended up getting some new york strip roast (whatever that is) which was on sale from $25 to $9 (woot!!) and it worked beautifully. Actually it worked so well that I will be returning to safeway the second I can switch into my contacts to buy up all the roasts they have left while they are on sale.

2 lbs thinly sliced beef sirloin, sliced 2-3 mm thick
5 cloves garlic, crushed
1 medium yellow onion, peeled and grated
1 Asian pear, peeled and grated (I used bartlette)
1 sweet apple, such as fuji, grated
2/3 cup soy sauce
2 tbs toasted sesame seed oil
2-4 tbs sugar (depends on sweetness of pear)
2 scallions, finely sliced
freshly ground black pepper to taste

You're supposed to squeeze the apple grating and only add the juice to the marinade but I accidently added the grated apple to everything and it seemed ok. Combine all ingredients, and massage the meat into the marinade. Let it sit in fridge overnight. Cook in nonstick pan (no oil required). In between batches, scrape off the burnt bits with wooden spatula.

To make thin meat slices, freeze the meat, let thaw in fridge halfway (see more precise instructions at use real butter) and slice with sharp knife.

Kimchi: storebought, but I want to try making my own sometime

Cucumber: cube english cucumber, toss with leftover scallion pancake sauce (1 tbs soy sauce, 1 tbs rice vinegar, grated ginger)
Tea: green tea
Rice: cook brown rice in rice cooker

Easy piece!
Posted by Picasa

Saturday, December 4, 2010

Pork Dumplings

I've been longing for dumplings for a while now but since I've yet to discover a Chinese grocery store in Portland that wasn't 45 minutes away via bus, I've been thwarted. You say TJ has dumplings but I'm not partial to the thin wonton skin of the TJ dumpling. I want a thicker, chewier skin - a proper Chinese dumpling skin. So with that in mind, I decided to give making my own dumplings a try. But I wanted to do it completely from scratch, the way my big aunt used to do. A quick search on the internet came up with a few promising recipe; I mixed and matched until I found a combination that seemed reasonable. It really wasn't hard at all and I will definitely be doing this again, with adjustments (noted below).

I actually made the pork filling first, but since I can't be bothered to reorder the pictures now that they're in blogger I will discuss dough first. But it really is best to make filling first because I noticed the dough started drying out.

So for the dough, mix 2 cups of flour with 1 cup of hot water and mix to make a dough. Knead for about 5 minutes until smooth (I think I will use a bit more flour next time to hopefully achieve a chewier dough, I found an alternate recipe that calls for 2 cups of water for 1/2 cup of water). Divide the dough into two and roll each piece out into a cylinder 12 inches long. Cut 1/2 inch sections as shown:


For filling, combine the following:
1 pound ground pork
a bit more than 1/2 tbs freshly grated ginger (I would definitely use a lot more next time)
3 cloves garlic, minced
2 tbs minced scallions
2.25 tbs soy sauce
a bit less than 2 tbs sesame oil (I might add less next time actually, maybe just 1 tbs)
a bit more than half an egg
shy 3 cups of finely shredded napa cabbage
dash of ground white pepper
(next time add a couple of dashes of salt too)

You may wonder why these measurements are so peculiar, but I had to halve a recipe that would have generated 100 dumplings. Making 34 dumplings took about 1.5 hours and that was quite enough for me.


To make wrappers, roll out each little nubbin of dough to 3 inch circles. My attempts at circles were approximate at best, but it didn't really matter as long as you can stuff some meat in there and scrunch it up. The entire process would have been faster with a helper of course. But if you are a single girl (or boy), roll out 4-5 wrappers at a time and fill with meat. This prevents the wrappers from drying out. To make a dumpling, put in about a tablespoon of filling in the center of each wrapper (this will vary depending on the size of the wrapper you rolled out, used best judgement here), dip a finger into water and wet the edge (half the circle) - there is no need to go crazy here, the dough is pretty soft. Then pinch the edges together and done! Next!


I think it's pretty obvious which ones were my first attempts:


And a closeup of some of the better lookings ones:


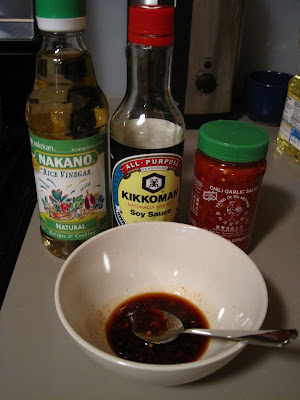
For the sauce, I usually combine three items: rice vinegar, soy sauce and a generous dollop of chili garlic sauce. I can't can't can't live life without chili garlic sauce.


I tested out fried dumplings and boiled dumplings and naturally fried won hands down. Since these were pretty big, it was easy to fry on all sides. The rest of the dumplings I lined up on a sheet of wax paper (not touching) and froze. When they are frozen I will stuff them in a bag and enjoy them in the days to come. Happiness!


Posted by Picasa

Sunday, October 17, 2010

Living Room


I realized I never put up a picture of my living room so here it is. I love it during the day when all the light spills in. Even on cloudy days it's lovely to look over and see the doors and the lines of the metal fence through the doors and windows. And I love how the floor gleams. The one thing I don't love is the blue milk cart my TV is sitting on but since my postdoc budget is not going to be able to cover an alternative for quite some time it is something I can definitely live with. On weekends I like to sit on one side of the sofa and flip through my New Yorkers, or when I'm industrious, flip through papers. Tony can usually be found sitting on top of a cushion or curled on the other side by my feet. Or curled on my tummy while I read. Just as he is lying next to my laptop now...

Making Soap

Because I'm a girl with a lot of hobbies I decided the only thing to do is to add to the list. I made my first batch of soap yesterday using the following recipe that I devised with the aid of this very nice lye calculator and the instructions at the simple dollar:

70% olive oil (11.2 oz)
20% coconut oil (3.2 oz)
10% crisco (1.6 oz)
handful of ground oatmeal
handful of lavender buds

Melt oils together (not too much, try not to exceed 120 degrees or it takes forever to drop back down) and then toss in the oatmeal and lavender. In a separate bowl combine:

2.2 oz lye
6.1 oz milk (previously frozen and then broken up into a bit of a slushy)

(Note to self: I found this mixture reached near 120 degrees)

Once the temperature of both reaches near 100 degrees, combine lye mixture into oil mixture (NOT the other way around) and then stir for a million years with a spoon or spatula until it becomes thick. Then pour into molds (any kind of container really) and leave somewhere to cure for a few days (I'm not sure how long yet, it was certainly still too soft today) and then remove from mold and cut up with a knife. Then leave to cure for 6 weeks before use.

Obviously, use some common sense with the lye and don't re-use anything that has touched the lye for food. I highly recommend looking at the tutorial on the simple dollar since they provide very detailed instructions and have pictures to boot! I was watching a baseball game at the same time and could not be bothered to take pictures of this process.

Update 12/4/10: I've started using the soaps and am enjoying it a lot. I do feel it could use more lather though so next batch I will try 70% olive oil, 25% coconut oil (4 oz) and 5% crisco (0.8 oz). I will also not use milk (to see if the soap will be white) but will retain the lavendar buds and oatmeal for texture. I have to say I've been looking forward to my showers just for an opportunity to use soap. Once my bathroom sink soap is done I will replace with a homemade bar I think.

Sunday, October 10, 2010

Soymilk

I did it! I made a soymilk that was free of unpleasant grittiness with the right amount of salt and sweetness. Now I shall jot down my notes so I can remember it next time.

Make soymilk in machine according to instructions. 1/2 of a rice cup of dried soybeans works out well for a single batch (75 grams according to manufacturer's directions). Fill water to JUST above the bottom line. After it is done, strain through muslin cloth to remove residual grit. Add the following and boil for a few minutes. Cool to room temperature and refrigerate.

Two batches of soymilk
1/3 cup sugar (and a dash more perhaps)
1/4 tsp salt